 We have seen how we can "Generate and edit videos with Blender"Passing the process of obtaining images (Render) video editing of the same.
This editing process will be described at a basic level, focusing on the production of a video from a global perspective.
We have also seen how to move from one stream to another by transition effect “Wipe”.
This time we will see how superimpose one image over another in a region thereof. This effect is known by the name “Picture in Picture” or “PiP”
Picture-in-picture (PiP) is a feature of some television receivers and similar devices. One program (channel) is displayed on the full TV screen at the same time as one or more other programs are displayed in inset windows. Sound is usually from the main program only.(W)
This overlay effect can be made between images or videos either. In our case we use two images: “A” and “B”.
 |
 |
First thing we do is to enter the video editor. We can use the predefined settings main menu, seleccionando “Video Editing”
Add the two images or video sequences with the command Add->Image or Add->Movie as we wish to incorporate one or more images or a file with a video.
We can enable the display of files showing the browser to easily identify the images that will incorporate.
By incorporating the two images should be on different channels; in our case it has been placed image “A” In the channel “1” and image “B” In the channel “2”. We see that the image that prevails in principle is located on the highest channel, with more, although this depends on the type of effect (Blend) we are applying it as you see is “Cross” by default.
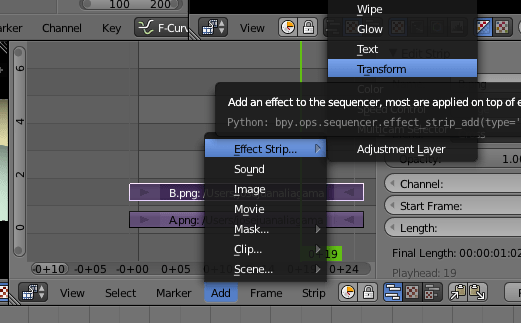
Pulsando con el botón derecho del ratón sobre la imagen “B” la selecionaremos. A continuación añadiremos un efecto “Transform” with Add->Effect Strip…_>Transform
El efecto se creará en un canal por encima del que tiene la imagen. En este caso el canal 3. El efecto que tiene asignado por defecto es “Replace”
El efecto “Transform” tiene diferentes variables que permiten su ajuste. Entre las que vamos a destacar encontramos la posibilidad de modificar la escala de la imagen de forma homogénea manteniendo la relación de aspecto o con valores diferentes para la altura y anchura de la misma, modificando su apariencia.
If we select “Uniform Scale” tendremos la opción de modificar un único valor para la escala. Al modificar este valor la imagen cambiará de tamaño, reducing or increasing depending on the new value of scale that introduce.
If we reduce its size see a background with a grid representing the transparent area around the image there, but not see the image “A” below.
To view the image “A” Under “B” we modify the effect applied to the transformation as we saw was “Replace” adding this transformation.
If we change the effect “Blend” the tansformación by “Over Drop” or “Alpha Over” see image “A” It located in the lower channel occupying the area of the grid (transparency).
We will only change the position of the image by changing the value in the corresponding area of the variables that handle the effect “Transform”. Adjust the fields “X” and “And” position and if necessary adjust the scale again.
The result is that you can see in the picture below.
The variables in Blender you can animate, incorporating “Keyframes” to them we can make interesting effects of input and output images as discussed below.


Must be connected to post a comment.